
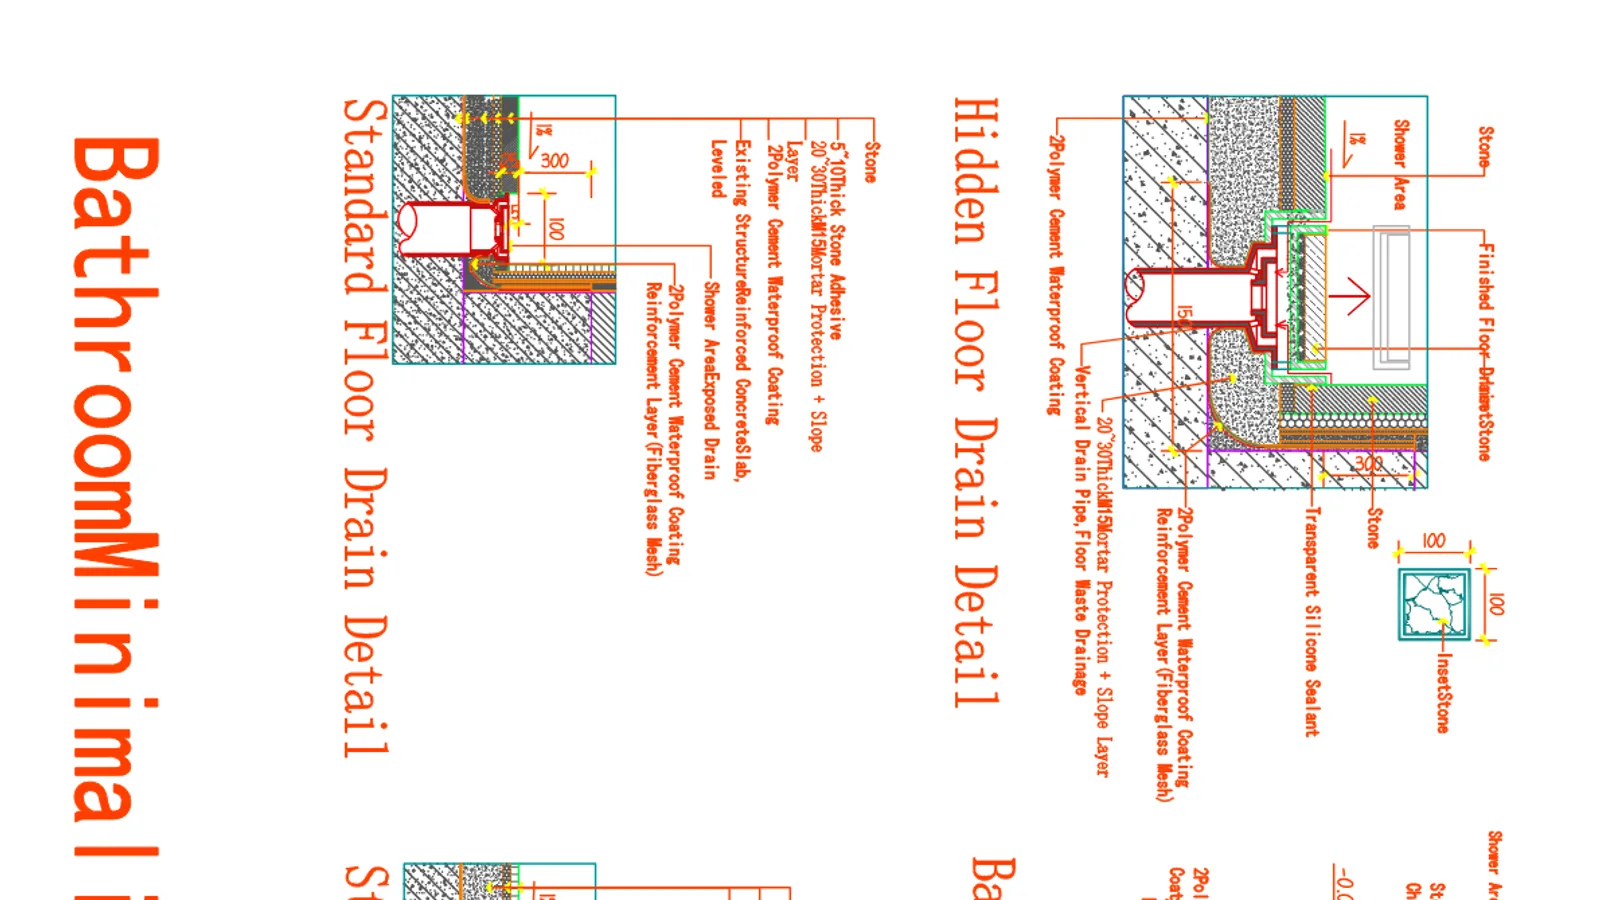
Shower Drain Construction Details: 4 CAD Sections Every Specifier Should Know
Specifying a shower drain is only half the job. The other half is making sure the contractor actually builds up the floor correctly - slope, waterproofing, mortar bed, tile adhesive, and sealant - so water reaches the drain and never finds its way under the tile.
This page shares the four construction sections we use on our minimalist linear drain projects. They are the same details we hand to architects, tilers, and waterproofing contractors. You can download the PDF reference drawing and the editable AutoCAD (.dwg) file at the bottom of this page.
Detail 1 - Standard Floor Drain (Tile-In / Stone-In)
The default minimalist wet-room detail. The linear drain sits at the finished floor level, and a piece of the same floor tile (or stone) inserts into the grate frame so the drain almost disappears.
Layer build-up (from structural slab up):
- Existing reinforced concrete slab, leveled and repaired
- Two coats of polymer cement waterproof coating, reinforced with fiberglass mesh at the corners
- Cement mortar protection + slope layer (20-30 mm thick), falling at 1% toward the drain
- 5-10 mm thick tile adhesive (thin-set)
- Finished tile / stone surface, flush with the drain grate
The drain body itself sits on the waterproofing, and the flange is embedded in the second coat. The vertical waste pipe passes through the slab with a sealed penetration.
Detail 2 - Shower Area Water-Stop Strip (Glass Partition)
For showers that use a fixed 12 mm tempered glass screen instead of a curb. The glass meets the floor on top of a continuous water-stop strip, and the linear drain sits just inside the glass line.
Key points:
- 12 mm tempered glass, bedded on transparent silicone sealant
- A 3 mm chamfer on the stone/tile edge where it meets the glass - this lets the sealant sit in a clean fillet instead of being squeezed out
- The waterproofing layer continues up the glass face by at least 100 mm
- The 1% slope still runs toward the linear drain inside the glass line
Detail 3 - Hidden Floor Drain (Exposed Shower Drain Variant)
A variant where the drain grate is a slim slot rather than a tile-in insert. The build-up is identical, but the drain body is slightly narrower and the vertical outlet can be offset up to 50 mm from the centerline.
This detail is used when the design calls for a visible, brushed stainless slot (for example matte black or brushed gold PVD) rather than a seamless tile-in look.
Detail 4 - Bathroom Water-Stop Curb
For traditional curbed showers. A low waterproofing curb (formed in mortar, covered in the same polymer cement coating) separates the wet shower zone from the dry bathroom floor. The linear drain sits inside the curb line.
Key points:
- The curb must be monolithic with the waterproofing - never a separate cement piece bonded on top
- Min. 20 mm mortar thickness at the thinnest point (marked "Min. Thickness" on the drawing)
- The finished tile on the dry side should sit 15-20 mm higher than the shower floor inside the curb
Why Layer Build-Up Matters
We see the same three failures on site:
- No slope, or slope wrong way. Water ponds in the corner because the tiler laid the mortar flat.
- Waterproofing stops at the drain flange instead of wrapping up the drain body. This is the #1 cause of leaks into the ceiling below.
- Tile adhesive too thick (15 mm+), so it shrinks and cracks, pulling the tile away from the mortar bed.
The details below show the correct order: waterproofing first, then slope mortar, then adhesive, then tile.
Download the CAD Files
We have released these four sections in two formats for your design team:
- Download PDF reference drawing (English) - 554 KB, A3, all four details on one sheet
- Download AutoCAD .dwg file (English) - editable, units in millimeters, layers named in English
The DWG is a 2D section detail (not a 3D BIM object). If you need a Revit (.rfa) family or a 3D model for a specific drain length, contact our technical team and we will prepare it for your project.
Related Resources
- Linear vs Point Shower Drains: How to Choose
- Linear Drain Grate Styles Explained
- Linear Drain Flow Rate & Slope Calculation
- BIM & CAD Center
Melody Drain
Our Architect Series linear shower drains are designed to work with these exact details: 300/400/600/800/1000 mm standard lengths, 304 stainless body (201 available), tile-in and slot grate options, 50 mm water-seal trap, vertical or horizontal outlet. Custom lengths and 316 stainless are available on request for coastal or commercial projects.
Contact us to request samples or a custom CAD detail for your project.