
Tile-In Linear Drain Detail: How a Concealed Shower Drain Is Built Into Stone or Tile
A tile-in linear drain - sometimes called a hidden, concealed, or invisible drain - is the detail behind the seamless no-drain wet-room look. From the finished floor it reads as a continuous slab of stone or large-format tile; only a thin slot along the wall (or across the shower) gives it away.
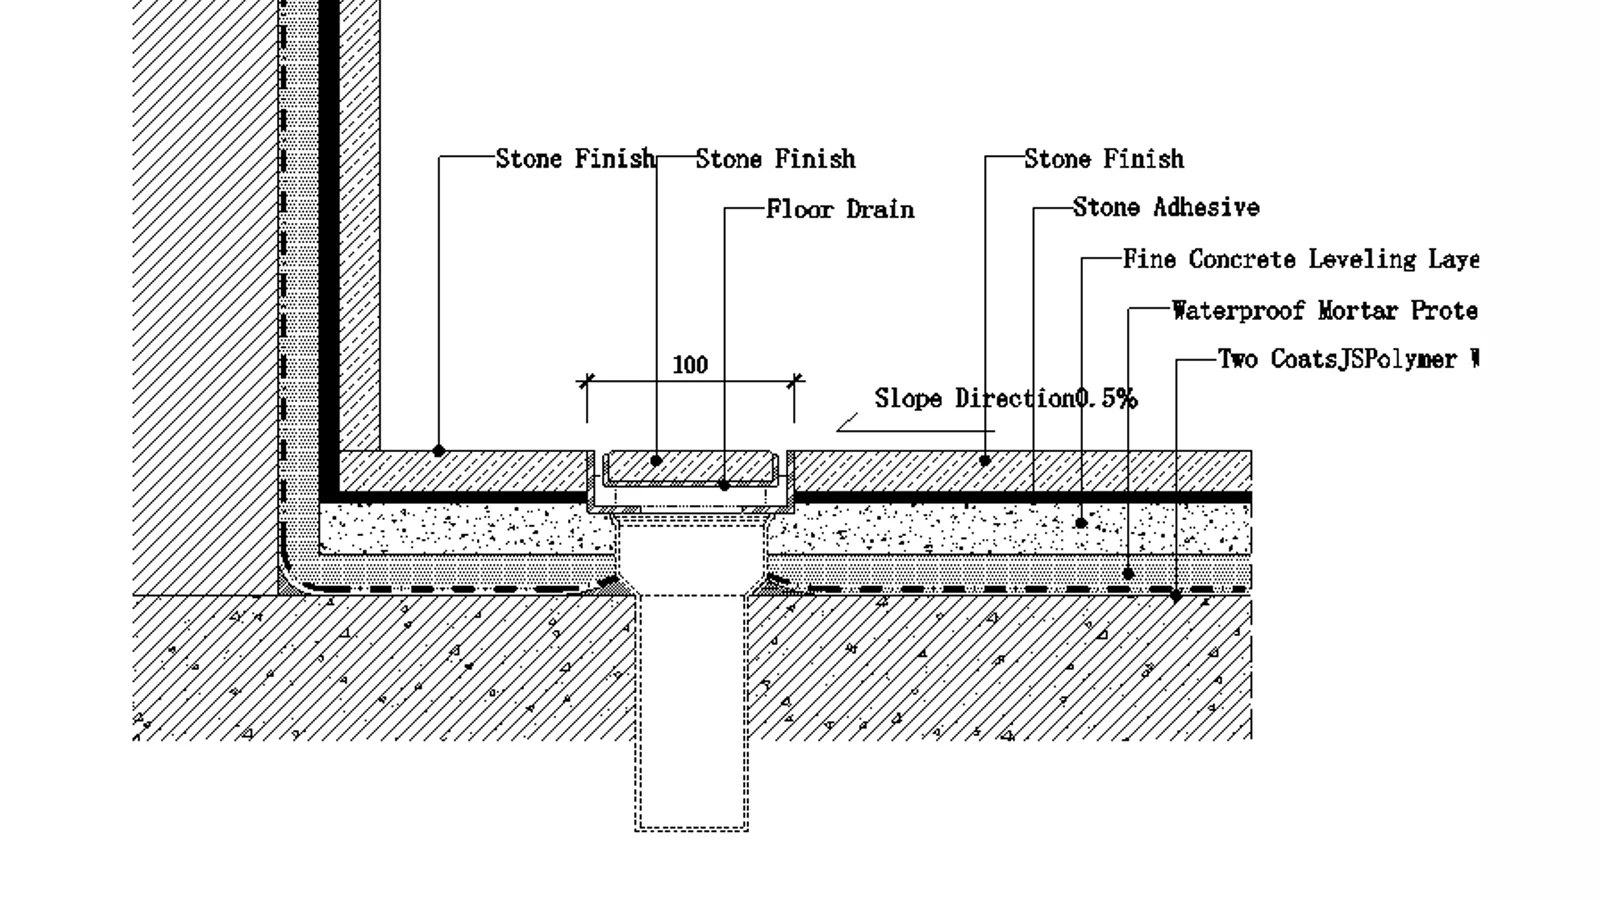
But that seamless look is built, not bought. The detail below is a real construction section for a finished (tile-in) linear drain installed at a wall, with every layer called out.
What the section actually shows
Reading the detail from top down:
- Stone finish (top layer). The floor is finished with natural stone or large-format porcelain, cut so the last row sits flush with the drain flange.
- Stone adhesive bed. A 5-10 mm polymer-modified adhesive sets the stone. Because the drain is tile-in, the stone edge must be cut to a clean, straight line parallel to the channel.
- Fine concrete leveling layer. A bonded mortar screed builds the floor up and creates the 0.5% slope toward the drain.
- Waterproof mortar protection. A cementitious protection layer covers the waterproof membrane and protects it during tile-setting.
- Two coats of polymer waterproofing. Applied over the screed and lapped 100 mm up the wall, with a reinforcement band at the internal corner. This is the line that keeps water in the wet room.
- The drain body itself. A stainless-steel channel with a removable grate (or tile-in tray) sits in the screed, connected to the waste pipe below.
- Building wall on the left, with the waterproofing turned up the face.
Why the 0.5% slope matters
The dimension 0.5% on the drawing is not decorative. It means for every meter of run, the floor drops 5 mm toward the channel. At that slope:
- Water reaches the drain in seconds, not minutes.
- The thin tile-in slot does not pond at the far end.
- The waterproofing membrane stays dry on top once you have finished showering.
Steeper slopes (1-2%) are used in commercial or public wet areas; 0.5% is the residential sweet spot where the floor still looks flat.
Where the detail typically fails
Tile-in drains look simple, but three construction errors destroy the look:
- Waterproofing stops at the flange, not up the wall. Water migrates behind the stone and shows up as a stain on the wall months later. The membrane must lap up the wall.
- Screed is not sloped. Without a true fall, water sits in the tile adhesive and feeds mold.
- Stone edge is not cut straight. A wavy edge next to a 20 mm slot looks cheap immediately.
Free CAD detail
We have published this exact section as a downloadable DWG + PDF (units in mm, English labels):
The previous detail in this series covers a minimalist shower drain construction section; for the product side, see our linear shower drain range and the linear vs point drain comparison.